 Cloud Ops Chronicles
"Goodbye GCP JSON Keys: Secure Hybrid Authentication via WIF and TPM/Secure Enclave Chips"
Authenticating on-premises servers or local workstations to cloud providers (specifically Google Cloud) has historically relied on exporting Service Account keys (in JSON format for Google). However, storing static secrets on local hard drives presents major security risks (accidental leaks, lack of rotation, complex auditability).
The “Why Now?”: Google now actively recommends abandoning Service Account keys in favor of federated identity solutions such as Workload Identity Federation (WIF). This transition is driven by Google’s security best practices and facilitated by GCP organization policies (specifically the constraint iam.disableServiceAccountKeyCreation) that allow organizations to completely block the creation of new static service account keys.
This article presents an architecture to completely eliminate these JSON keys by replacing them with a temporary cryptographic identity, anchored in the physical chip of your machines (TPM 2.0 or Secure Enclave) and validated by GCP Workload Identity Federation (WIF) in a fully serverless manner.
Summary
In this article, you will learn how to:
Permanently remove Service Account JSON keys from your local servers and workstations.
Use the physical security chip (TPM 2.0 or Secure Enclave) of your machines as a root of trust.
Configure GCP Workload Identity Federation (WIF) to validate temporary security tokens.
Provision this architecture using Terraform.
Deploy this configuration in Daemonless mode (via Google’s Executable Credentials) or via a local emulator.
Prepare for a future evolution towards the SPIFFE/SPIRE identity standard.
The “Big Picture” (Global Vision)
As introduced, the core idea is to use the hardware-protected cryptographic key (TPM or Secure Enclave) to sign a temporary token (JWT) that can be exchanged for a short-lived GCP token.
Here is the simplified diagram of the authentication flow:
sequenceDiagram
    participant Machine as Local Machine<br/>(TPM / Enclave)
    participant STS as GCP Security<br/>Token Service
    participant GCS as GCS Bucket<br/>(Public JWKS)
    participant Target as GCS Bucket<br/>(Backups)

    Machine->>Machine: Generates & Signs JWT (Private Key)
    Machine->>STS: Sends signed JWT
    STS->>GCS: Downloads Public Key (JWKS)
    GCS-->>STS: Returns jwks.json
    STS->>STS: Verifies signature
    STS-->>Machine: Returns short-lived GCP Token
    Machine->>Target: Secure write (GCP Token)
    Target-->>Machine: Success
In summary, the flow works as follows:
-
The client machine generates a temporary token (JWT) locally.
-
It signs this JWT using its private key, which remains confined within its physical chip.
-
It transmits the signed JWT to Google Cloud (STS).
-
Google verifies the signature by fetching the machine’s public key (statically hosted on a public GCS bucket).
-
Google validates the identity and returns a short-lived GCP access token.
-
The machine uses this token to execute its tasks.
Typical use case: Allowing administrators to schedule automatic backup scripts to GCS, without ever storing passwords or API keys on the servers.
Access Methods Comparison Table
As shown in the following table, the physical chip method provides the highest level of security and flexibility:
| Solution | Key on disk | Key rotation | Hardware root of trust | Deployment complexity |
|---|---|---|---|---|
| Classic JSON Key | Yes ❌ | Manual / Complex ❌ | No ❌ | ⭐ (Easy but risky) |
| Classic WIF (AWS/Azure/Okta) | No ✅ | Automatic ✅ | Partial (depends on IdP) | ⭐⭐⭐ |
| WIF + Hardware Key (TPM / Enclave) | No ✅ | Automatic ✅ | Yes (Physical chip) ✅ | ⭐⭐⭐⭐ |
| SPIFFE / SPIRE | No ✅ | Automatic ✅ | Yes (Physical chip) ✅ | ⭐⭐⭐⭐⭐ (Heavy: requires direct TCP agent/server access via Network Load Balancer, restricting hosting to GCE or GKE) |
When to use this architecture?
✅ Ideal for:
- Automated on-premises backups: Securely authenticating local servers to a Google Cloud Storage bucket.
- Edge Computing & IoT: Identifying physical machines or industrial gateways isolated in the field.
- Admin workstations (Mac/Linux/Windows): Allowing administrators to set up automated tasks (maintenance scripts, scheduled syncs, etc.) that execute without their personal credentials. For interactive operations, the best practice remains to authenticate via
gcloud auth login— this architecture specifically targets scenarios where no human is present to re-enter credentials. - Partially isolated (Air-Gapped) environments: Servers only need outbound access to Google APIs.
❌ Not suited for:
- Kubernetes workloads (GKE / on-premises): Use native Kubernetes identity (GKE Workload Identity) or the SPIFFE/SPIRE framework instead to manage identities at scale.
- Virtual machines on Google Compute Engine: Use native service accounts attached to instances transparently.
- Managed cloud services (Cloud Run, Cloud Functions): Leverage native service account impersonation built into GCP runtimes.
1. Architecture and Components
To validate the signed JWT assertion generated by the client machine’s chip, Google Cloud needs access to that machine’s public key. Rather than deploying and maintaining an active, expensive identity provider (like Okta or a Keycloak server), we use a fully serverless, minimal-cost model:
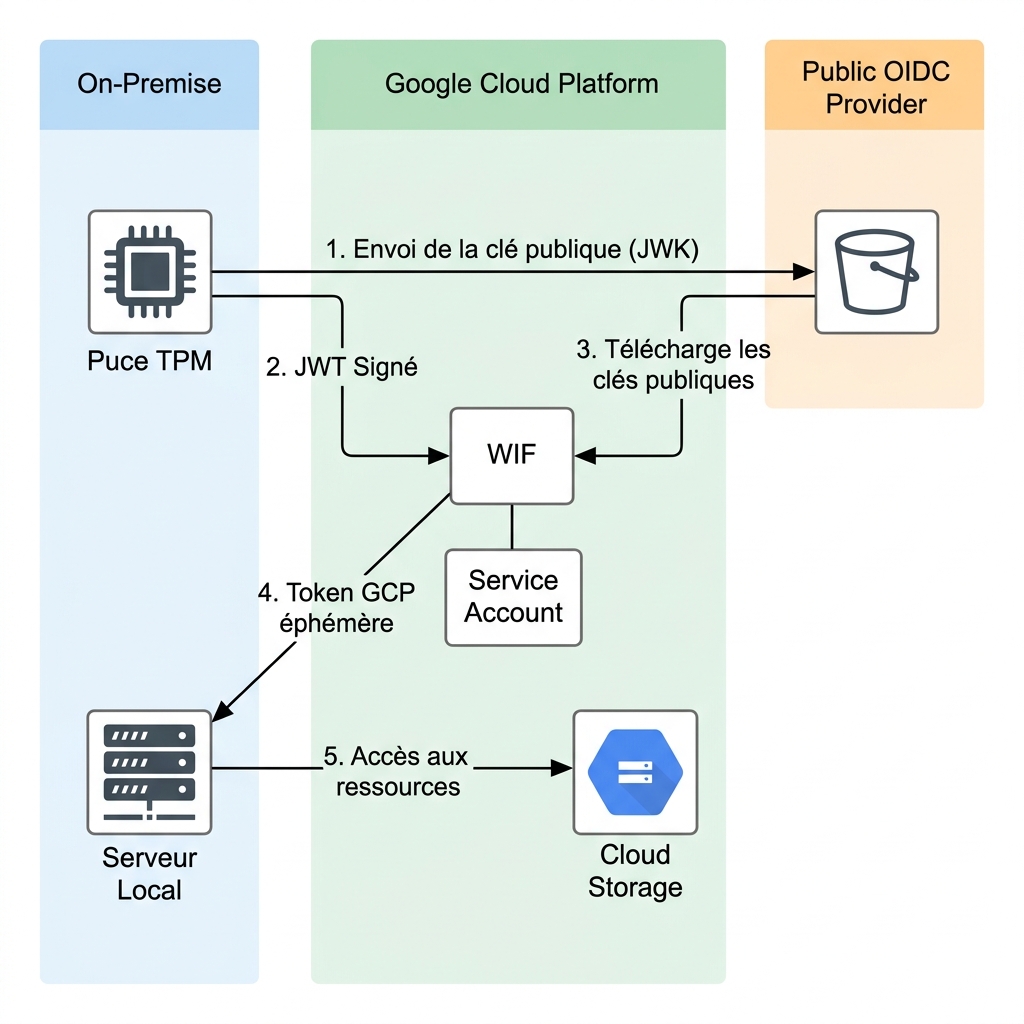
It relies specifically on:
- A Public Cloud Storage bucket hosting two static OIDC files:
.well-known/openid-configuration: Describes our minimalist identity provider.-
jwks.json: Contains the public keys (JSON Web Keys) of the authorized machines. -
A Workload Identity Pool & Provider (OIDC) configured in GCP to trust our GCS bucket as the identity issuer (Issuer URL).
RFC Standards Used
The jwks.json file complies with the RFC 7517 standard (JSON Web Key). The signed assertion complies with the RFC 7515 standard (JSON Web Signature). The final token exchange with the Google STS API (https://sts.googleapis.com/v1/token) is governed by the RFC 8693 standard (OAuth 2.0 Token Exchange).
JWKS Caching by Google
Google STS does not download the jwks.json file for every token request. GCP heavily caches the OpenID Configuration document and the JWKS to limit load on the issuing server. Therefore, when adding or rotating a key, you must expect a propagation delay (the exact TTL is not documented by Google) before the new key becomes usable.
Impact on Revocation
This caching mechanism has a critical security consequence: if a machine is compromised and you remove its public key from jwks.json, revocation will not be immediate. Until Google’s cache expires, an attacker possessing the private key could continue to obtain valid tokens. This is currently the main limitation of this architecture. Hopefully, Google will provide a cache purge mechanism or explicit revocation on the WIF side in the future.
2. Terraform Configuration (Provisioning)
Now that the principle is clear, here is how to set it up with Terraform.
Below is the Terraform code that configures the static OIDC issuer on GCS, the WIF Pool, compiles the public keys of the machines, and restricts Service Account impersonation to registered machines.
The structure of the Terraform directory is as follows:
terraform/
├── main.tf          # Main logic: public OIDC bucket, backup bucket, SA, WIF Pool, OIDC Provider,
│                    #   JWKS compilation, and IAM bindings per machine
├── variables.tf     # Input variables: project_id, project_number, region, and jwks_dir (path to public keys)
├── outputs.tf       # Exported outputs: bucket names, SA email, WIF Pool ID, issuer URL, and registered machines
└── jwks/            # One .json file per machine (JWK public key)
    ├── macbook-pro.json
    └── srv-backup-01.json
The key point of this approach: Terraform automatically reads all files in the jwks/ directory, compiles an aggregated jwks.json, generates the .well-known/openid-configuration document, uploads both to GCS, and creates an IAM binding per machine:
# Extract from terraform/main.tf — JWKS compilation and multi-machine IAM
locals {
  jwk_files = fileset(var.jwks_dir, "*.json")

  jwk_keys = [
    for f in local.jwk_files : jsondecode(file("${var.jwks_dir}/${f}"))
  ]

  jwks_json = jsonencode({ keys = local.jwk_keys })

  machine_fingerprints = {
    for f in local.jwk_files :
      trimsuffix(f, ".json") => jsondecode(file("${var.jwks_dir}/${f}")).kid
  }
}

# Upload compiled JWKS to GCS
resource "google_storage_bucket_object" "jwks_json" {
  name         = "jwks.json"
  bucket       = google_storage_bucket.jwks_bucket.name
  content      = local.jwks_json
  content_type = "application/json"
}

# One IAM binding per machine, linked to its key fingerprint
resource "google_service_account_iam_member" "wif_sa_impersonation" {
  for_each = local.machine_fingerprints

  service_account_id = google_service_account.backup_sa.name
  role               = "roles/iam.workloadIdentityUser"
  member             = "principal://iam.googleapis.com/projects/${var.project_number}/locations/global/workloadIdentityPools/${google_iam_workload_identity_pool.hardware_pool.workload_identity_pool_id}/subject/machine-${each.value}"
}
To add a new machine, simply drop its JWK file in terraform/jwks/ and run terraform apply. To revoke a machine, delete its file and re-run — Terraform will remove its key from the JWKS and delete its IAM binding.
3. Hardware Signing Logic (Clients)
The JWT Hashing and Signing Pipeline
To authenticate with Google WIF, the local client constructs a temporary security token (JWT) containing the mandatory claims: iss (Issuer), aud (Audience), sub (Unique subject based on the public key fingerprint), iat (issued at time), and exp (expiration time, set to 5 minutes).
The JWT Header and Payload are Base64URL encoded and concatenated with a dot. This string is hashed via SHA-256, and the resulting 32-byte digest is sent to the physical processor for signing using the internal private key (ECDSA P-256 / ES256).
Format Conversion: DER (TPM) to Raw R || S (JWT)
Hardware chips (like TPMs) typically return signatures in the standardized ASN.1 DER format. This format encapsulates the two integers $R$ and $S$ of the ECDSA signature in a binary structure. To comply with the JWT standard (ES256), our client code extracts these two integers and concatenates them as a flat 64-byte block ($R$ padded to 32 bytes || $S$ padded to 32 bytes).
A. macOS: Swift & CryptoKit (Secure Enclave)
On macOS, we use CryptoKit to generate a private key inside the Secure Enclave.
The complete source code is available in client-swift/main.swift.
The private key is never exportable through public software APIs (it is protected by the physical security processor). To reuse the same key, the program saves a wrapped secure representation of the key (key.wrapped). This file is encrypted by the current machine’s Secure Enclave and is completely useless if copied to another computer.
B. Linux: Go & go-tpm (TPM 2.0)
For Linux servers equipped with a TPM 2.0, the implementation relies on the standard TPM protocol and uses the official go-tpm v0.3.3 library. The complete code is written in client-tpm/main.go.
To avoid key collisions with other local software, the TPM persistent storage handle is not hardcoded but configurable using the -tpm-handle option.
Multi-user Isolation on Linux (TPM)
Please note that the TPM does not provide native isolation per Unix user. A key stored at a persistent handle is accessible to any process with read permissions on the /dev/tpmrm0 device. On a multi-user server, another local account could therefore use this key to authenticate with GCP.
TPM 2.0 resolves this issue by associating an authorization policy with the key (password, PCR policy, or HMAC session). While fully implementable, this protection is not covered in this article to keep the implementation simple and focused on the WIF flow. For a multi-user production environment, this is an important additional step to consider.
C. Windows: PowerShell & CNG (TPM 2.0)
On Windows, we can interact with the TPM 2.0 using the Microsoft Platform Crypto Provider via PowerShell and .NET’s Cryptography Next Generation (CNG) APIs.
The private key is generated and stored inside the TPM. The signature returned by the Windows CNG API is already in the raw $R \parallel S$ format (64 bytes), meaning no DER-to-RAW conversion is required.
Here is the PowerShell script to generate a TPM-backed key and export its public key in JWK format:
# Create a TPM-backed ECDsa P-256 key
$keyName = "gcp-wif-backup-key"
$keyParams = New-Object System.Security.Cryptography.CngKeyCreationParameters
$keyParams.Provider = "Microsoft Platform Crypto Provider"
$keyParams.KeyCreationOptions = [System.Security.Cryptography.CngKeyCreationOptions]::OverwriteExistingKey

$cngKey = [System.Security.Cryptography.CngKey]::Create(
    [System.Security.Cryptography.CngAlgorithm]::ECDsaP256,
    $keyName,
    $keyParams
)

# Export the public key (CNG ECC Public Blob format)
$pubBlob = $cngKey.Export([System.Security.Cryptography.CngKeyBlobFormat]::EccPublicBlob)

# Extract X and Y coordinates (32 bytes each, starting after the 8-byte header)
$xBytes = $pubBlob[8..39]
$yBytes = $pubBlob[40..71]

# Base64URL encoding helper
function Safe-Base64Url([byte[]]$bytes) {
    [Convert]::ToBase64String($bytes).Replace('+', '-').Replace('/', '_').TrimEnd('=')
}

# Generate Key ID (kid) based on SHA-256 fingerprint of the public key coordinates
$sha256 = [System.Security.Cryptography.SHA256]::Create()
$fingerprint = $sha256.ComputeHash($xBytes + $yBytes)
$kid = (Safe-Base64Url $fingerprint).Substring(0, 16)

# Construct JWK
$jwk = @{
    kty = "EC"
    crv = "P-256"
    x   = Safe-Base64Url $xBytes
    y   = Safe-Base64Url $yBytes
    kid = $kid
} | ConvertTo-Json -Compress

Write-Output "Public JWK:"
Write-Output $jwk
To sign the JWT using the TPM key in PowerShell:
# Load the key from the TPM provider
$cngKey = [System.Security.Cryptography.CngKey]::Open($keyName)
$ecdsa = New-Object System.Security.Cryptography.ECDsaCng($cngKey)

# Hashing the JWT header and payload
$jwtBytes = [System.Text.Encoding]::UTF8.GetBytes("$header.$payload")
$sha256 = [System.Security.Cryptography.SHA256]::Create()
$hashBytes = $sha256.ComputeHash($jwtBytes)

# Sign hash directly (returns raw R || S signature)
$sigBytes = $ecdsa.SignHash($hashBytes)
$signature = Safe-Base64Url $sigBytes

$jwt = "$header.$payload.$signature"
4. Deployment and Configuration Guide
Step 1: Initializing Client Configuration
Create or update your client-swift/config.json file with your real GCP credentials.
Step 2: Compiling the Swift Client
Compile the Swift client on your macOS using the native compiler:
swiftc -O client-swift/main.swift -o client-swift/backup-auth
Step 3: Hardware Key Generation and Registration
Execute the binary, pointing it to the terraform/jwks registration directory to generate the cryptographic private key in the Secure Enclave, display the associated public JWK, and save it directly in the correct format:
./client-swift/backup-auth generate \
  --config client-swift/config.json \
  --key-out client-swift/key.wrapped \
  --jwks-dir ./terraform/jwks
This command produces:
1. The wrapped physical key token client-swift/key.wrapped (used for signing JWTs).
2. The individual JWK public key file saved directly in terraform/jwks/<your-machine-name>.json.
3. The corresponding public JWK displayed on the standard output.
(For Linux servers with TPM 2.0, the equivalent call using the Go client also supports the --jwks-dir option).
Repeat this operation for each machine to be registered. Each machine generates its own file in terraform/jwks/.
Step 4: Terraform Provisioning
Initialize and apply the Terraform configuration. It will automatically compile all machine keys into an aggregated jwks.json, upload it to GCS along with the OIDC discovery document, configure the WIF pool, and create an IAM binding per machine:
cd terraform
terraform init
terraform apply \
  -var="project_id=your-gcp-project" \
  -var="project_number=123456789012"
Quick Addition / Revocation
To add or revoke a machine later, simply add or delete its .json file in terraform/jwks/ and rerun terraform apply.
Towards a GitOps Approach
In this article, we execute Terraform locally to keep the demonstration simple. In a DevOps workflow, enrolling a new machine would involve a merge request to the Terraform Git repository: the machine’s administrator generates their public key, commits it to terraform/jwks/, and submits an MR. A peer can then validate the addition (verifying identity, fingerprint, etc.) before merging. The CI/CD pipeline then applies the terraform apply automatically. This GitOps flow provides complete auditability of the authorized machine inventory and can even be fully automated when provisioning new servers.
5. Local Integration Choices: Agentless vs Emulator
To connect the local authentication of your machines to GCP tools, two options are available:
Option A: The Recommended “Agentless” Approach (Executable Credentials)
This is Google’s recommended solution because it aligns with the standard WIF model and avoids opening local network ports in the background.
The Google SDK runs our local binary directly as an ephemeral subprocess to retrieve the signed JWT and handles exchanging it with Google STS.
You configure a local credentials file (e.g., credentials-config.json):
Adapt Absolute Paths
Do not forget to adapt the absolute paths (such as /Users/username/... or /home/username/...) to the backup-auth binary, the --config configuration, and the --key-in key based on the actual directory structure of your workstation or client server.
{
  "type": "external_account",
  "audience": "//iam.googleapis.com/projects/YOUR_PROJECT_NUMBER/locations/global/workloadIdentityPools/hardware-auth-pool/providers/hardware-oidc-provider",
  "subject_token_type": "urn:ietf:params:oauth:token-type:jwt",
  "token_url": "https://sts.googleapis.com/v1/token",
  "service_account_impersonation_url": "https://iamcredentials.googleapis.com/v1/projects/-/serviceAccounts/backup-agent-sa@YOUR_PROJECT_ID.iam.gserviceaccount.com:generateAccessToken",
  "credential_source": {
    "executable": {
      "command": "/Users/username/gcp-workload-identification/client-swift/backup-auth credential --config /Users/username/gcp-workload-identification/client-swift/config.json --key-in /Users/username/gcp-workload-identification/client-swift/key.wrapped",
      "timeout_millis": 5000,
      "output_filesize_limit_bytes": 1048576
    }
  }
}
For Windows, you can configure the credential configuration to invoke PowerShell and pass the path to your signing script:
{
  "type": "external_account",
  "audience": "//iam.googleapis.com/projects/YOUR_PROJECT_NUMBER/locations/global/workloadIdentityPools/hardware-auth-pool/providers/hardware-oidc-provider",
  "subject_token_type": "urn:ietf:params:oauth:token-type:jwt",
  "token_url": "https://sts.googleapis.com/v1/token",
  "service_account_impersonation_url": "https://iamcredentials.googleapis.com/v1/projects/-/serviceAccounts/backup-agent-sa@YOUR_PROJECT_ID.iam.gserviceaccount.com:generateAccessToken",
  "credential_source": {
    "executable": {
      "command": "powershell.exe -NoProfile -ExecutionPolicy Bypass -File C:\\path\\to\\backup-auth.ps1 -GetToken",
      "timeout_millis": 5000,
      "output_filesize_limit_bytes": 1048576
    }
  }
}
To use this file with your applications (via Google client libraries), set the GOOGLE_APPLICATION_CREDENTIALS environment variable as well as the security variable GOOGLE_EXTERNAL_ACCOUNT_ALLOW_EXECUTABLES which allows running the binary:
export GOOGLE_APPLICATION_CREDENTIALS="/Users/username/gcp-workload-identification/credentials-config.json"
export GOOGLE_EXTERNAL_ACCOUNT_ALLOW_EXECUTABLES=1
For the gcloud CLI (which does not natively use ADC environment variables for its standard commands), explicitly authenticate the CLI using this file:
gcloud auth login --cred-file=/Users/username/gcp-workload-identification/credentials-config.json
Then, execute your commands by enabling the executable authorization:
GOOGLE_EXTERNAL_ACCOUNT_ALLOW_EXECUTABLES=1 gcloud storage cp /data/backup.tar.gz gs://secure-backup-unique-name/
Option B: The Metadata Emulator (Local Daemon)
Fallback Alternative: If you are using Docker containers or legacy scripts with direct HTTP requests, you can run our Go daemon (metadata-emulator/main.go) in the background on the loopback interface.
By setting export GCLOUD_METADATA_HOST=127.0.0.1:8080, network requests are redirected to the emulator, which mimics the behavior of a Google Compute Engine VM.
Note: GCLOUD_METADATA_HOST is an internal SDK testing environment variable and should not be considered a long-term production integration point.
6. Scaling Up (GitOps & Limits)
Automated Enrollment (GitOps)
Across a large fleet of machines, the CI/CD pipeline that provisions on-premises servers can be configured to automatically consolidate public keys:
1. Each new machine generates its key at boot, and the post-provisioning job submits its JWK public key (as a file like jwks/machine-01.json) via a Pull Request to a Git repository.
2. The CI/CD pipeline (e.g., Terraform) validates the format, merges the individual keys into a global jwks.json file as described above.
3. The pipeline automatically deploys the updated file to the trusted Cloud Storage bucket.
Scalability Limits of a Static JWKS
Google does not publish strict limits on the size of the JWKS file imported by Google STS. However, a file containing more than 1,000 signing keys (about 400 KB of text data) degrades authentication network performance during token resolution.
For very large fleets, it is best to segment machines into multiple separate JWKS files (one per department or environment) or point the WIF OIDC Provider to a dynamic API (e.g., Cloud Function + Firestore database) that retrieves the public key individually on-demand using the kid (Key ID) claim.
7. Perspectives and Sovereignty (SPIFFE / S3NS)
The serverless hardware-based WIF architecture constitutes the first logical step towards adopting standardized cloud-native identity models, such as the CNCF’s SPIFFE/SPIRE project.
In a SPIFFE deployment, local workloads no longer need local wrapped key files; they dynamically retrieve short-lived cryptographic identity tokens (JWT-SVIDs) by querying the SPIFFE Workload API locally via a UNIX domain socket. The central SPIRE server exposes its public JWKS, which is then federated with Google Cloud’s WIF service.
Operational Sovereignty and “Trusted Cloud”
This architecture integrates naturally with European Trusted Cloud providers such as S3NS (the joint venture between Thales and Google Cloud, qualified SecNumCloud by ANSSI in France).
In this scenario, the hardware anchor (TPM 2.0) keeps the authentication private key on national soil, within your local datacenters, while the trusted OIDC configuration files are hosted securely and isolated within the S3NS sovereign zone. This ensures a complete separation of powers and robust protection against extraterritorial laws.
Conclusion
For a long time, securing connection from an on-premises machine to cloud providers meant storing a static Service Account key on the local disk, carrying a persistent risk of leakage. With Workload Identity Federation and modern hardware security modules (TPM 2.0 and Secure Enclave), it is now possible to completely eliminate these static secrets. By leveraging the native Executable Credentials feature, this approach brings hybrid infrastructures closer to Zero Trust principles, while paving the way for universal identity architectures like SPIFFE/SPIRE.