 Cloud Ops Chronicles
Why You Need SSH Certificates
Introduction
When you work in the cloud, securing access to production Linux servers is essential as your workload are internet faced. Large companies juggle the critical needs of maintaining tight control, enforcing granular access, and ensuring the highest level of security.
Traditional SSH keys, while a cornerstone of remote access, can introduce challenges in these areas. This blog post explores why, SSH certificates in combining the power of Vault offer a compelling alternative to traditional SSH keys.
We’ll delve into the crucial aspects of managing access to production environments:
- Centralized Control and Expiring Credentials: SSH certificates, issued and managed by a central Certificate Authority (CA), provide a single point of control for access. Unlike static SSH keys, certificates can have defined lifespans, ensuring compromised credentials are automatically revoked after expiration.
- Banishing Root Login: The inherent dangers of root login are well documented. SSH certificates empower you to enforce non-root access, promoting a principle of least privilege and minimizing potential damage.
- Granular Visibility and Access Control: Certificates offer a granular level of access control. You can define not only who can access a server, but also what commands they can execute and under what conditions (permit-pty, port-forwarding, …). This level of detail provides a clear audit trail and minimizes the attack surface.
By implementing SSH certificates, Compagnies can gain a significant edge in securing their production environments.
The Perils of Private Keys: Why Sharing or Poor Management is Risky
There are a few reasons why people or administrators might keep their SSH private keys on their computers.
- It’s undeniably convenient. Having your private key readily available allows for quick and easy access to servers without needing to enter a password every time. This can be a major time-saver, especially for those who connect to multiple servers frequently.
- Some users misunderstand the security implications. They might believe that as long as their computer is secure (strong passwords, firewalls etc.) then the private key stored on it is safe as well.
But:
- If your private key falls into the wrong hands, attackers gain full access to any server you can access with that key. This could allow them to steal data, install malware, or disrupt critical operations.
- if you lose your private key, you’ll be locked out of the servers you need to access. This can cause significant downtime and disruption.
Implementing and managing SSH certificates, especially for those unfamiliar with them, might seem like a complex additional step compared to the simplicity of using a private key. However, while using cloud provider tools like AWS SSM Connect or GCP oslogin can be a solution. But using SSH certificates offer the advantage of being natively multi-cloud compatible, providing a unified approach across different cloud environments.
💡💡💡 ** So we need a tools to help us ** 💡💡💡
Use Case: SRE and Developer SSH Access with Hashicorp Vault
A development team needs access to a production server for troubleshooting and debugging purposes. The SRE team is responsible for managing server access and security.
Generating and distributing SSH Certificate
Prerequisites:
- A running Vault instance
- A basic understanding of Vault concepts like secrets engines, policies, and roles.
Enable the SSH Secrets Engine:
Before diving into the configuration, it’s essential to understand what the SSH secrets engine does. It provides a secure way to manage SSH credentials, offering features like:
- Dynamic SSH credentials generation
- Certificate-based authentication
- Role-based access control
- Integration with other Vault features
To enable the SSH secrets engine, you’ll use the Vault CLI. Here’s the command:
vault secrets enable -path=ssh ssh
This command mounts the SSH secrets engine at the path /ssh. You can customize the path if needed.
Create Certificate-Authority for hashicorp vault
We have two methods for establishing a Certificate Authority (CA): the Command-Line Interface (CLI) and Terraform.
- To generate a CA via bash :
vault write ssh/config/ca generate_signing_key=true
- Or to generate a CA via terraform :
resource "vault_mount" "ssh_signer" {
  path        = "ssh-client-signer"
  type        = "ssh"
  description = "Sign ssh public keys"
}

resource "vault_ssh_secret_backend_ca" "user" {
  backend              = vault_mount.ssh_signer.path
  generate_signing_key = true
}
output "pub_key" {
  value = vault_ssh_secret_backend_ca.user.public_key
}
Adding Roles Authorization for Developers in Hashicorp Vault
To effectively manage developer access to SSH certificates within Hashicorp Vault, we need to configure SSH authorizations for signing developper requests.
- With terraform
resource "vault_ssh_secret_backend_role" "user" {
  name                    = "mgoulin"
  backend                 = vault_mount.ssh_signer.path
  key_type                = "ca"
  allow_user_certificates = true
  default_extensions = {
    "permit-agent-forwarding" = ""
    "permit-pty"              = ""
    "permit-port-forwarding"  = ""
  }
  ttl = "1h"
}
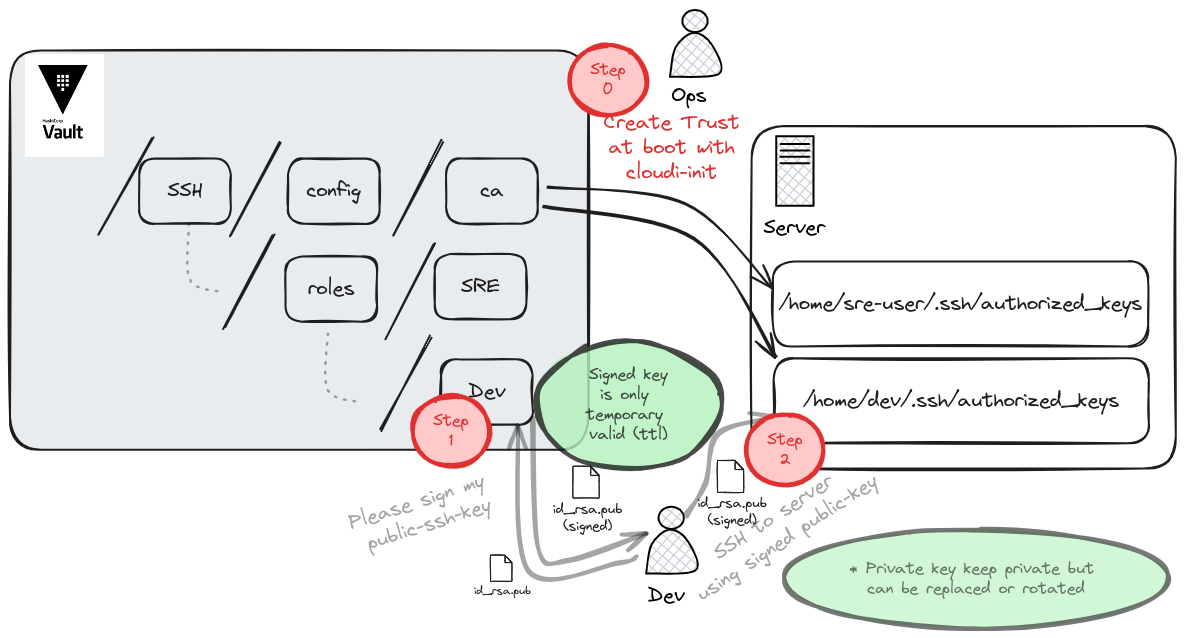
Step 0: Injecting Certificate Authority into AWS, Azure, and GCP Servers
Injecting SSH public keys into cloud instances is a common practice to enable secure SSH access. Here’s how to do as SRE it on AWS, Azure, and GCP.
AWS
Add the public key to a key-pair object in EC2 service using the aws ec2 import-key-pair command.
echo "cert-authority $(vault read -field public_key ssh-client-signer/config/ca)" > /tmp/authorized_keys.txt
aws ec2 import-key-pair --key-name "dev-key" --public-key-material fileb:///tmp/authorized_keys.txt
GCP
Add the public key to the instance metadata using the gcloud compute project-info add-metadata command.
export USERNAME=dev
echo "$USERNAME:cert-authority $(terraform output -r pub_key)" > /tmp/authorized_keys.txt
cloud compute project-info add-metadata --metadata-from-file=ssh-keys=authorized_keys.txt
Azure
Add the public key to the instance metadata using the az sshkey command.
echo "cert-authority $(vault read -field public_key ssh-client-signer/config/ca)" > /tmp/authorized_keys.txt
az sshkey create --name "dev-key" --public-key "@/tmp/authorized_keys.txt" --resource-group "myResourceGroup"
Custom OnPrem Instances
Add the public key to the instance as root by adding the following line to /home/$USERNAME/authorized_keys file.
export USERNAME=dev
echo "cert-authority $(vault read -field public_key ssh-client-signer/config/ca)" >> /home/$USERNAME/authorized_keys
How developers can connect with ssh signed certificates
Traditionally, SSH connections relied on public and private key pairs for authentication. While effective, this method presents challenges in terms of key management, revocation, and access control. With Certificate-Authority and HashicorpVautl, certificates bind a user’s identity to their public key, enabling stronger authentication and granular access control.
With SSH certificates, developers can connect to remote servers securely without the need to manage private keys directly. The process involves:
Step 1: Requesting a Certificate: As a developper I want to sign my ssh keys
Developers request an SSH certificate from a centralized authority, often through a self-service portal or calling Vault API.
It can be done with the following vault command. During the request, developers provide their public key, typically stored as id_rsa.pub.
vault write -field=signed_key ssh/sign/dev \
    public_key=@$HOME/.ssh/id_rsa.pub > signed-cert.pub
Step 2: SSH Connection: As a developper I want to connect on my instances via ssh
Developers utilize the previously issued signed certificate : signed-cert.pub, often referred to as a client certificate, to authenticate with the target server. This certificate, typically in PEM format, contains the developer’s public key signed by the trusted Certificate Authority (CA), which in this case is Vault.
When connecting to the server, the SSH client presents the signed certificate. The server then verifies the certificate’s authenticity and validity against the CA’s public key. If successful, the connection is established, and the developer gains access to the server.
ssh -i ./signed-cert.pub -v -i ~/.ssh/id_rsa dev@<target_server>
Conclusion
By adopting SSH certificates and leveraging a centralized certificate authority management tool such as Hashicorp Vault, organizations can significantly enhance their SSH security posture. This approach offers a robust solution to the challenges posed by traditional SSH key management, providing granular control, improved auditability, and streamlined access management.
By transitioning to SSH certificates, organizations can mitigate risks associated with compromised keys, facilitate key rotation, and enforce strong access policies. This ultimately leads to a more secure and efficient SSH infrastructure.
While implementing SSH certificates requires careful planning and configuration, the long-term benefits in terms of security and manageability far outweigh the initial investment.
By following the guidelines outlined in this article, organizations can successfully deploy SSH certificates and reap the rewards of a more secure and controlled SSH environment.